Sunday, November 27, 2011

UPDATE: NEW PHONE, MY BIRTHDAY, UPCOMING REVIEWS, HOLIDAYS!

Hey girls,
It has been a while since I did an update so I figured I would inform everyone of things that have happened, recent events and exciting things coming up.

I think I will start off with my birthday which is today and just thank every single one of you who wished me a happy birthday. It made my day to see all of you kind people who took the time out of their day to send me a little birthday message. It made my birthday so special to see that not only my family and friends I know in real life are celebrating my birthday but also those of you who I have met on the internet! It's just insane and overwhelming how lovely you all are. I appreciate every single one of you and can't put into words how much you all mean to me!!


I recently became an iPhone 4s owner and have been loving the way it lets me interact with all of you while out and about. Before this phone, I had a HTC Touch Pro 2 which did have email and everything like that but for some reason it's just so much more convenient on an iPhone! I have become good friends with Siri!! I found some gorgeous cases at one of those phone case kiosks that I thought I would show but have also ordered a few off eBay so I'm waiting on those to arrive. I have the white 64GB one and I seriously don't know why it's 64GB (I will never need that much space!) but it was a gift so I didn't exactly chose that or anything. The only sad thing is that my iPad is black and because my iPhone is white..they don't match. So I'm working on looking for a case to make my iPad look white or I'm going to have to go to Apple and pay them to change it (they can do that!). The only reason I even purchased the black iPad is because I preordered mine as white but they mixed it up and it came as black but i didn't want to wait another month to get more stock in so I was stuck with black and it hasn't mattered until now. There are so many more apps for iPhones than there are for iPads so I'm discovering all these amazing apps new to me! I think that's all..yep..onto the next topic!

I have a couple of really exciting companies I'm going to be introducing you to in upcoming videos and blogs! The first is Kawaii Companions where I will be reviewing some really adorable jewellery! The second one is gvsavings1 which is an online makeup shop which sells a variety of brands including ELF, MAC, Cherry Lashes, Ardell Lashes etc. So i think those will be really exciting reviews that you girls may be interested in so look out for those!

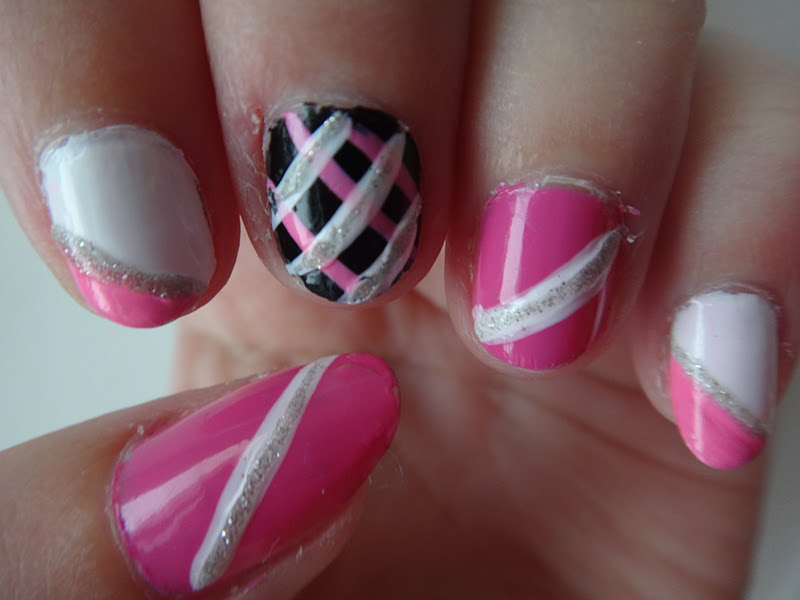
On another note, school is finished for the year and I have two months holiday now until the next year begins! Next year is my last year of high school and I am so excited to make it the best year yet! I'm even more excited now that I have so much extra time to update my blog, make YouTube videos, reply to emails, tweet, etc. Exams were so stressful this week but I am just so glad that it is over and very ready for Summer shopping, fashion, beach, swimming, bikinis, flip flops, coral colours and end of year parties! Christmas is rapidly approaching so I will have some christmas recipes up on my cooking blog, festive nails, makeup, hair, fashion and gift guides! Then we will repeat the process for New Years!!

I hope you are all really well. Thank you so much for reading my blog and sticking with me. Stay safe and take care!

NOTD: PINK, WHITE AND BLACK STRIPES

Hey girls,
I was playing around with some nail tools I bought the other day and came up with a few designs so I thought I would share them with you!
I went with a black, white, pink and silver theme but I think it would be really cute to do green, red, white and silver closer to Christmas for festive nails.
 For the first design, I painted the base coat white then painted an angled corner pink and joined the two colours with a silver glitter line.
 For the second design, I painted the base colour as black then painted pink angled stripes one way and white angled stripes the opposite way, putting silver glitter polish over the white stripes.
 The last design I did was just a pink base coat with a white angled line, splitting the nail in half and putting a line of silver glitter polish in the middle of the white line.

Friday, November 25, 2011

GET THE LOOK: NIKKI REED


I created this series on my blog so if you are interested in wearing what the specific celebrity is wearing, you are able to find out where to purchase each item to reconstruct the exact outfit. I think this is great because celebrities are always very fashionable and put together so now anyone can know where to find and buy these products online to look just as fashionable!
This time i will be recreating a look I saw on Nikki Reed that i fell in love with and thought she wore so well! I have been following Nikki Reed's career now for a little bit because she was on Season 3 of The OC back in the 2000's and i thought she was gorgeous but i'm not a big fan of her in Twilight. I think she was really daring to wear such a bold dress but accessorised it so well and pulled it off perfectly!


Image 1 of ASOS Sequin Dress with Knot Twist
This dress is gorgeous and looks very similar to the one Nikki is wearing except for the top details which you cover up with the blazer jacket anyway.
The jacket blazer Nikki is wearing is very shiny and a silky material so I thought this one ressembled it closely enough except for the sleeves which can be rolled up.
Giuseppe Zanotti Zipper Sandal - Glamorous Zip-Up Heels
These shoes are so hot and the zipper makes it look so badass.

Image 1 of ASOS Webbing Belt
ASOS Webbing Belt
The dress Nikki is wearing comes with a belt and because the one chosen does not, a belt has to be added. Any simple stretchy material belt works and just wear it with the buckle to the back which is hidden under the blazer.

 A plain black envelope purse with a gloss to it with any gold details on the flap.

Nikki is wearing a simple pearl bracelet but any other sorts of bangles work well also.


OPI "Linkin Park After Dark"
Nikki is wearing a very dark almost black colour on her nails but it's not entirely black. My personal favourite nail polish similar to hers is "Linkin Park After Dark" which is gorgeous for fall!

Wednesday, November 23, 2011

HOW TO: FIND YOUR SIGNATURE SCENT

Hey girls,
If your an avid reader of my blog then you probably know by now that i love the perfumes DKNY "Be Delicious" and Marc Jacobs "Daisy". I suppose that you could call these my "signature scents". A lot of people ask me to recommend perfumes to them but realistically i can't because everyone if different and you have to experience some things for yourself to ensure your making the right decision for you. Scent is a very personal thing and perfume suprisingly has a lot to do with your life. Perfume has the ability to bring back memories in one spray about times in your life when you have worn it so it is important to find a rememberable scent that you love. With all of the options out there today it can be so confusing! Especially when you think you have found your favourite perfume then you realise there are special release ones that all smell slightly different. There are a five tips i have that helped me when i was on the search for my signature scent and they may help you as well!
Tip 1. Don't let YouTube guru's, blogs, friends or family influence you. At the end of the day, you have to wear it so it's you who has to like it. Don't get caught up in a review a guru does on it or a recommendation from your sister, scents are so personal that taste dramatically varies from person to person so there is a high possibility that what someone else likes, you won't.

Tip 2. Don't buy a perfume based on the way the bottle looks or it's popularity. When someone smells your perfume they have no idea what the bottle it came in looks like and all they know is how it smells. So make the scent of the perfume your top priority and the way the bottle looks at the bottom of the list. If you find a scent you love but hate the packaging, there are plenty of easy and inexpensive ways to transfer the scent to other jars!
Tip 3. Don't let people persuade you to chose one. Your choice has to be based solely on your opinions so if a shop assistant offers their help, it's probably best you do it on your own and don't have them trying to sell you the whole shop while your there. Also, don't let online fragrance quizzes determine what your scent should be like. These online tests will not only not help but probably confuse you even more.

Tip 4. Test out the perfume a couple of times. Once you think you have found your dream scent, ask for a sample (they usually have one) or spray it on in the shop a couple of times. This will give you insight as to how the scent will react to your skin, how long it lasts and if it changes smell during the day.

Tip 5. Never stop looking for your signature scent. Just like fashion, scents change as well. Switch up your perfume when you are bored or for the season. Don't feel like your obligated to only use that one perfume your whole life because you found one your really love! Keep looking for new and better scents that you love even more or for different occasions.
I hope this potentially helps you find your "signature scent". Good luck!

THE MUPPETS COLLECTION

Hey girls,
I have recently been really getting into nail polish! So i was super excited when i stumbled upon the new OPI "The Muppets" collection and decided to pick up a few colours. The whole collection is gorgeous and especially the glitters are spectacular but a single OPI nail polish in Australia is $20 and i didn't want to break the bank so i only picked up three, each with a reason behind why i chose them!


The first colour that caught my eye was "Rainbow Connection" and from first sight i instantly knew i had to have it. I had however seen this nail polish prior to really seeing it because when i was getting my nails done a week or so ago i noticed this one on the shelf and died at it's beauty but was devestated when there was no label on the bottom and noone in the salon knew what it's name was. I later saw this colour on a couple of blogs so i found out the name and went shopping the same day for the single purpose of picking up this polish which i never thought i would ever find again!
So there isn't really one significant colour you can refer to this polish as apart from rainbow! There is a mixture of silver, green, pink, gold, red and blue glitter in clear nail polish.
The glitter goes on very sparse so to achieve a super packed on glittery look you need at least 3 coats and i recommend a base coat of black or white so the glitter shows up well.
I couldn't contain my happiness when i realised that "Rainbow Connection" perfectly matches a dress i love and own. If you read my previous post about this dress then you would know i have it in both cream and black. So I would probably wear a black or white base under the glitter polish depending on what shade of the dress i was wearing so it matched my outfit exactly.
The next two polishes i picked up from "The Muppets" collection were festive purchases in preperation for Christmas!
"Gettin' Miss Piggy With It" is a clear polish with vibrant red glitter specks and particles with some silver specks mixed in also.

I don't usually go for greens but i had to stop myself from purchasing the blue one because i already have way too many blues in my collection. The green is a great change of pace and reminds me so much of Kermit!
"Fresh Frog Of Bel Air" is a clear polish with vibrant green glitter specks and particles with some silver specks mixed in also.
Both "Gettin' Miss Piggy With It" and "Fresh Frog Of Bel Air" are extremley versatile and can be styled in many festive ways. You could put silver polish underneath them both if you didn't want your green and red to be too contrasting and kind of still match. You could put red and green nail polish underneath the glitter to really enhance the colours. You could also use either black or white depending on what your wearing.


Please tell me if you pick up anything from this collection and what you think about it!

Monday, November 21, 2011

NAIL TUTORIAL: CUPCAKE NAILS

Hey girls,
I have another nail tutorial for you and this one is how to get super cute cupcake nails. This was my first attempt so please excuse all of the mistakes i made but hopefully you can get the idea.
Step #1: Prepare your nails. Buff, shape and shine however you like to. Paint on your favourite base coat, nail hardener or whatever you like to put on your nails before you put polish on. This step is completely up to your personal preference.
Step #2: Apply a different colour to each nail. Paint as many coats on as you need to get a good solid colour. I'm using pastel colours because they remind me of cupcakes.
 Peachy coral for my middle finger, butter london "Trout Pout".
This beauty pastel peach kind of reminds me of salmon but i love that about it and the best part is that it goes on super smooth, precise and pigmented. I only need one coat to give me a solid colour but it's pretty expensive and retails for $22!

 Pastel yellow for my pinky, BYS "Bright Lights".
I love this colour because it is the first yellow i have find that is a perfect pastel milky yellow and doesn't look gross or streaky on the nails like OPI "Need Sunglass" and "The It Colour". All BYS nail polishes are only $4 so it is an absolute steal to find such and affordable but amazing colour.

 Baby blue for my index finger, OPI "No Room For The Blues".
I used this gorgeous pastel blue in my last tutorial and i am absolutley obsessed with this colour! So in for Spring and it's versatility is unbelievable. All OPI polishes are $20.

Milky green for my ring finger, OPI "Gargantuan Green Grape".
This is a great variation of a mint polish which was huge last Spring, it's a bit lighter and less teal than the true minty colours so it's a great milky pastel which reminds me so much of cupcakes. All OPI polishes are $20.

Candy floss pink for my thumb, OPI "Shorts Story".
This colour is probably my favourite that i used for this tutorial. A fun bubblegum pink thats really girly and gets me back in touch with the days i used to play with Barbies but is still very mature and wearable. All OPI polishes are $20.

Step #3: Using a white nail polish, create "icing" on the tips of your nails. Try applying the polish on in 3 strokes, creating what looks like cupcake frosting.
 The white i used to create the icing is OPI "Alpine Snow".

Step #4: Decorate your cupcakes any way you like. I added sprinkles, a cherry and white/silver glitter lines to create the look of cupcake papers.
 I used OPI "Big Apple Red" to create a dot at the top of my nail to look like a cherry.
 I used OPI "Apline Snow" to draw the lines which ressemble cupcake wrappers and then used Rimmel "Your Majesty" over the top to give some silver glitter.


Finish off with a top coat and your done! I hope you girls liked this really cute cupcake tutorial! If you have any suggestions for my next nail tutorial please tell me in a comment below!