
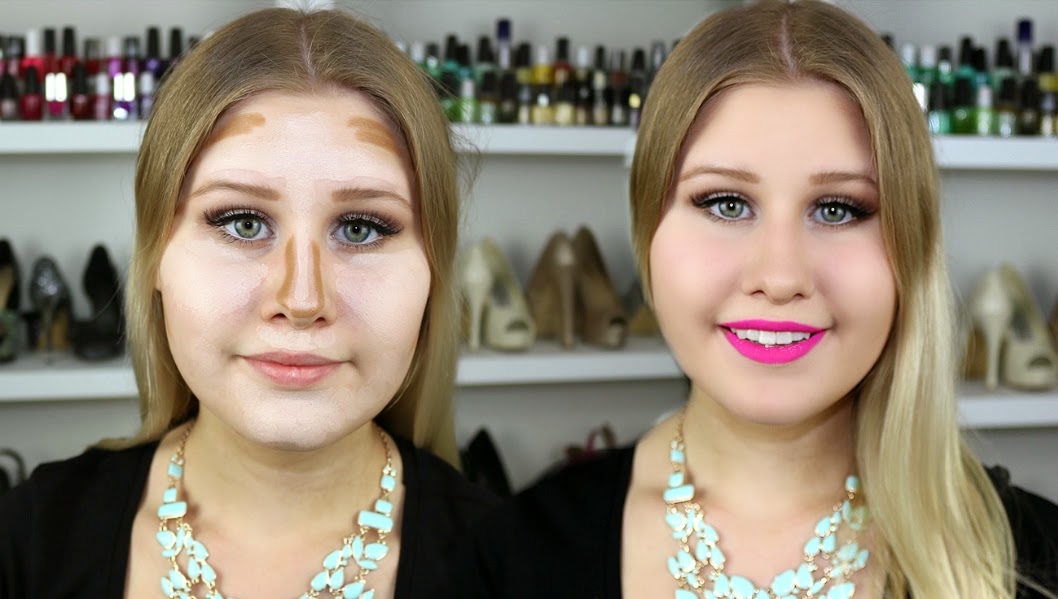
This post is going to prove to you all once again the incredible power of makeup where in this case it can make your facial structure appear different depending on where you put a highlight and contour.
The basic method is highlight to accentuate and contour in places you want to minimise. I am using foundation or this routine because I want to show you how simple it can be when you don't have to worry about fiddling around with concealers and foundations at the same time. It doesn't take that much extra time to use two different shades of foundation and apply them in different areas but it is more complicated than just slapping on foundation. So this is not a massive huge process and could be achievable for everyday use plus I think the results are well worth the effort.

Contouring
I like to contour first, before the highlight so I take the FIT Me Stick in 330 and apply it to places I want to contour and create shadow/depth. I place this shade just under my cheekbones for cheek definition, my temples, the sides of my nose to minimise the size, under my jaw and a bit on my forehead for a bit of bronze.
Highlight
Next I take the lighter colour, Maybelline FIT Me Stick in 110, to highlight and apply this to places that I want to accentuate and draw attention to. I place this shade between my eyebrows, on my cheekbones, the centre of my nose, chin, and cupids bow.
Blending
To blend all of this together I have found that smaller tools are most effective since you want to keep each colour in their designated area. So I use a dome blending brush to blend in the contour colour, a straight tapered done brush to blend the highlight then finally an all over face done brush to buff everything in for a seamless look.
Setting
You can add foundation over the top but for a lighter finish I like to set this look with a powder foundation and tapered powder brush. Since we are using foundation and not concealer, it's not thick of cakey and can easily be set with a powder without creasing.
My Flawless Foundation Routine
I hope you enjoyed this and found it helpful. It can take a little practice to work out what positioning of the products works best for you but you get the hang of it after the first few times but good luck with it all.
Thank you for reading ♥

* The Maybelline FIT Me Sticks were provided for this tutorial but it is not a sponsored post.
2 comments:
Im going try this next time I put my makeup on :)
Jessica
xx
www.fashionmagical.blogspot.co.uk
@Jessica
Fantastic to hear! Thanks for reading :) x
Post a Comment